Kubernetes - Deploy a Highly Available Cluster with RKE2, Kube-VIP, MetalLB and Rancher
Author: Vivek Chandran
Date: September 22, 2024
Overview
In today's post, we'll explore a powerful bash script I have written that automates the setup of a Rancher Kubernetes Engine 2 (RKE2) cluster. This script not only sets up the cluster but also configures essential components like kube-vip for high availability, MetalLB for load balancing and Rancher for cluster management. Let's dive into the details!
What is RKE2?
RKE2, or Rancher Kubernetes Engine 2, is Rancher's next-generation Kubernetes distribution, built with a focus on security, scalability and compliance, particularly for the U.S. Federal Government. It merges the benefits of Rancher’s lightweight Kubernetes (K3s) and the robust features of RKE, providing a secure and easy-to-deploy platform for mission-critical workloads. This distribution simplifies the complexities of Kubernetes while focusing on security for environments with strict compliance needs.
Key features of RKE2
-
Compliance and Security: RKE2 is FIPS 140-2 compliant, adheres to the CIS Kubernetes Benchmark and is the only Kubernetes distribution certified for use by the Department of Defense (DoD).
-
Flexibility: Whether deployed on-premise, in the cloud, or at the edge, RKE2 ensures a streamlined Kubernetes experience.
-
CVE Scan: Regularly scans components for CVEs using trivy in build pipeline
Script Overview
The script is designed to streamline the process of setting up a production-ready Kubernetes cluster. Here's what it does:
- Sets up one master node and multiple additional master and worker nodes
- Configures kube-vip for high availability
- Installs and configures MetalLB for load balancing
- Deploys Helm for package management
- Installs Cert-Manager for certificate management
- Deploys Rancher for cluster management
Important Note on Authentication
This script uses password-based authentication for SSH access to the nodes. If you prefer to use key-based authentication, you'll need to modify the script to suit your needs. Specifically, you'll need to update the run_remote() and copy_remote() functions to use SSH keys instead of passwords.
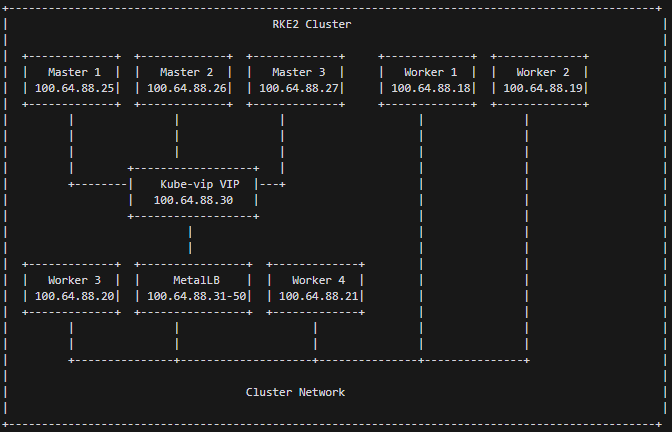
Cluster Architecture
The script creates a highly available Kubernetes cluster with the following architecture:
- Master Nodes: Three master nodes for high availability
- Worker Nodes: Four worker nodes for running workloads
- Load Balancing:
- kube-vip for API server load balancing
- MetalLB for service load balancing
- Cluster Management: Rancher deployed for easy cluster management and monitoring
High Availability with kube-vip
The script sets up kube-vip to provide a virtual IP for the Kubernetes API server. This ensures that the API server remains accessible even if one of the master nodes fails.
Load Balancing with MetalLB
MetalLB is configured to provide Layer 2 load balancing for services. This allows you to create LoadBalancer services that are accessible within your network without needing a cloud provider.
Cluster Management with Rancher
Rancher is deployed to provide a user-friendly interface for managing your Kubernetes cluster. It offers features like:
- Cluster monitoring
- Workload management
- User authentication and authorization
- Project and namespace management
Script Design and Functionality
The script is designed with modularity and reusability in mind. Here's a breakdown of its main functions:
create_yaml_files(): Generates necessary YAML files for kube-vip and MetalLB configuration.install_sshpass_local(): Ensures sshpass is installed for non-interactive SSH access.run_remote()andcopy_remote(): Utility functions for executing commands and copying files to remote nodes.setup_first_master(): Configures the first master node, including RKE2 installation and initial cluster setup.setup_additional_master(): Adds additional master nodes to the cluster.setup_worker(): Configures and adds worker nodes to the cluster.post_install(): Performs post-installation tasks like setting up MetalLB, Helm, Cert-Manager, and Rancher.
The script uses color-coded output to make it easy to follow the setup process and identify any issues that may arise.
Script
#!/bin/bash
# Synopsis:
# This script automates the setup of an RKE2 (Rancher Kubernetes Engine 2) cluster.
# It configures one master node and multiple additional master and worker nodes.
# The script also installs and configures kube-vip, MetalLB, Helm, Cert-Manager, and Rancher.
#
# Author: Vivek Chandran
# Date Created: 22-09-2024
#
# Note: This script is inspired by work from Jim's Garage.
# Set variables
KVVERSION="v0.6.3" # Kube-vip version, update if needed
admin=100.64.87.25 # Replace with your admin node IP address
master1=100.64.88.25 # Replace with your first master node IP address
master2=100.64.88.26 # Replace with your second master node IP address
master3=100.64.88.27 # Replace with your third master node IP address
worker1=100.64.88.18 # Replace with your first worker node IP address
worker2=100.64.88.19 # Replace with your second worker node IP address
worker3=100.64.88.20 # Replace with your third worker node IP address
worker4=100.64.88.21 # Replace with your fourth worker node IP address
user=root # Replace with the username for SSH access to your nodes
password=YourRootPasswordHere # Replace with the password for SSH access to your nodes
interface=ens192 # Replace with the network interface name on your nodes
vip=100.64.88.30 # Replace with the desired virtual IP address for kube-vip
lbrange=100.64.88.31-100.64.88.50 # Replace with the desired IP range for MetalLB
predefined_token="CodeN0m@dIsAwsome" # Replace with your desired cluster token
# Function to create YAML files
create_yaml_files() {
# Create kube-vip.yaml
cat <<EOF > kube-vip.yaml
apiVersion: apps/v1
kind: DaemonSet
metadata:
creationTimestamp: null
labels:
app.kubernetes.io/name: kube-vip-ds
app.kubernetes.io/version: ${KVVERSION}
name: kube-vip-ds
namespace: kube-system
spec:
selector:
matchLabels:
app.kubernetes.io/name: kube-vip-ds
template:
metadata:
creationTimestamp: null
labels:
app.kubernetes.io/name: kube-vip-ds
app.kubernetes.io/version: ${KVVERSION}
spec:
affinity:
nodeAffinity:
requiredDuringSchedulingIgnoredDuringExecution:
nodeSelectorTerms:
- matchExpressions:
- key: node-role.kubernetes.io/master
operator: Exists
- matchExpressions:
- key: node-role.kubernetes.io/control-plane
operator: Exists
containers:
- args:
- manager
env:
- name: vip_arp
value: "true"
- name: port
value: "6443"
- name: vip_interface
value: ${interface}
- name: vip_cidr
value: "32"
- name: cp_enable
value: "true"
- name: cp_namespace
value: kube-system
- name: vip_ddns
value: "false"
- name: svc_enable
value: "false"
- name: svc_leasename
value: plndr-svcs-lock
- name: vip_leaderelection
value: "true"
- name: vip_leasename
value: plndr-cp-lock
- name: vip_leaseduration
value: "5"
- name: vip_renewdeadline
value: "3"
- name: vip_retryperiod
value: "1"
- name: address
value: ${vip}
- name: prometheus_server
value: :2112
image: ghcr.io/kube-vip/kube-vip:${KVVERSION}
imagePullPolicy: Always
name: kube-vip
resources: {}
securityContext:
capabilities:
add:
- NET_ADMIN
- NET_RAW
hostNetwork: true
serviceAccountName: kube-vip
tolerations:
- effect: NoSchedule
operator: Exists
- effect: NoExecute
operator: Exists
updateStrategy: {}
status:
currentNumberScheduled: 0
desiredNumberScheduled: 0
numberMisscheduled: 0
numberReady: 0
EOF
# Create kube-vip-rbac.yaml
cat <<EOF > kube-vip-rbac.yaml
apiVersion: v1
kind: ServiceAccount
metadata:
name: kube-vip
namespace: kube-system
---
apiVersion: rbac.authorization.k8s.io/v1
kind: ClusterRole
metadata:
annotations:
rbac.authorization.kubernetes.io/autoupdate: "true"
name: system:kube-vip-role
rules:
- apiGroups: [""]
resources: ["services/status"]
verbs: ["update"]
- apiGroups: [""]
resources: ["services", "endpoints"]
verbs: ["list","get","watch", "update"]
- apiGroups: [""]
resources: ["nodes"]
verbs: ["list","get","watch", "update", "patch"]
- apiGroups: ["coordination.k8s.io"]
resources: ["leases"]
verbs: ["list", "get", "watch", "update", "create"]
- apiGroups: ["discovery.k8s.io"]
resources: ["endpointslices"]
verbs: ["list","get","watch", "update"]
---
kind: ClusterRoleBinding
apiVersion: rbac.authorization.k8s.io/v1
metadata:
name: system:kube-vip-binding
roleRef:
apiGroup: rbac.authorization.k8s.io
kind: ClusterRole
name: system:kube-vip-role
subjects:
- kind: ServiceAccount
name: kube-vip
namespace: kube-system
EOF
# Create metallb-ipaddresspools.yaml
cat <<EOF > metallb-ipaddresspools.yaml
apiVersion: metallb.io/v1beta1
kind: IPAddressPool
metadata:
name: first-pool
namespace: metallb-system
spec:
addresses:
- ${lbrange}
EOF
# Create metallb-l2advertisements.yaml
cat <<EOF > metallb-l2advertisements.yaml
apiVersion: metallb.io/v1beta1
kind: L2Advertisement
metadata:
name: example
namespace: metallb-system
spec:
ipAddressPools:
- first-pool
EOF
}
# Function to install sshpass on the local machine
install_sshpass_local() {
if ! command -v sshpass &> /dev/null; then
echo -e "\033[33mInstalling sshpass locally...\033[0m"
sudo apt-get update && sudo apt-get install -y sshpass
else
echo -e "\033[33msshpass is already installed.\033[0m"
fi
}
# Function to run commands on remote hosts
run_remote() {
local host=$1
local command=$2
sshpass -p "$password" ssh -o StrictHostKeyChecking=no $user@$host "$command"
}
# Function to copy files to remote hosts
copy_remote() {
local host=$1
local src=$2
local dest=$3
sshpass -p "$password" scp -o StrictHostKeyChecking=no $src $user@$host:$dest
}
# Setup first master node
setup_first_master() {
echo -e "\033[33mSetting up first master node...\033[0m"
echo -e "\033[33mDisabling UFW...\033[0m"
systemctl disable --now ufw
echo -e "\033[33mUpdating system...\033[0m"
apt update
echo -e "\033[33mDownloading kubectl...\033[0m"
curl -LO "https://dl.k8s.io/release/$(curl -L -s https://dl.k8s.io/release/stable.txt)/bin/linux/amd64/kubectl"
sudo install -o root -g root -m 0755 kubectl /usr/local/bin/kubectl
echo -e "\033[33mSetting up kube-vip...\033[0m"
sudo mkdir -p /var/lib/rancher/rke2/server/manifests
sudo mv kube-vip.yaml /var/lib/rancher/rke2/server/manifests/kube-vip.yaml
sudo cp /var/lib/rancher/rke2/server/manifests/kube-vip.yaml ~/kube-vip.yaml
sudo chown $user:$user kube-vip.yaml
echo -e "\033[33mSetting up RKE2 config...\033[0m"
mkdir -p ~/.kube /etc/rancher/rke2
cat << EOF > /etc/rancher/rke2/config.yaml
token: $predefined_token
tls-san:
- $vip
- $master1
- $master2
- $master3
write-kubeconfig-mode: "0644"
disable:
- rke2-ingress-nginx
EOF
echo -e "\033[33mSetting up environment...\033[0m"
echo 'export KUBECONFIG=/etc/rancher/rke2/rke2.yaml' >> ~/.bashrc
echo 'export PATH=${PATH}:/var/lib/rancher/rke2/bin' >> ~/.bashrc
echo 'alias k=kubectl' >> ~/.bashrc
source ~/.bashrc
echo -e "\033[33mInstalling and starting RKE2...\033[0m"
curl -sfL https://get.rke2.io | INSTALL_RKE2_TYPE=server sh -
systemctl enable rke2-server.service
systemctl start rke2-server.service
echo -e "\033[33mSetting up kubeconfig...\033[0m"
cp /etc/rancher/rke2/rke2.yaml ~/.kube/rke2.yaml
sed 's/127.0.0.1/'$master1'/g' ~/.kube/rke2.yaml > ~/.kube/config
cp ~/.kube/config /etc/rancher/rke2/rke2.yaml
echo -e "\033[33mApplying kube-vip configurations...\033[0m"
kubectl apply -f kube-vip-rbac.yaml
kubectl apply -f https://raw.githubusercontent.com/kube-vip/kube-vip-cloud-provider/main/manifest/kube-vip-cloud-controller.yaml
echo -e "\033[33mDisplaying nodes...\033[0m"
kubectl get nodes
}
# Setup additional master nodes
setup_additional_master() {
local host=$1
echo -e "\033[33mSetting up additional master node: $host\033[0m"
run_remote $host "sudo systemctl disable --now ufw && sudo apt update"
run_remote $host "curl -LO 'https://dl.k8s.io/release/\$(curl -L -s https://dl.k8s.io/release/stable.txt)/bin/linux/amd64/kubectl' && sudo install -o root -g root -m 0755 kubectl /usr/local/bin/kubectl"
run_remote $host "sudo mkdir -p /var/lib/rancher/rke2/server/manifests"
copy_remote $host "kube-vip.yaml" "/var/lib/rancher/rke2/server/manifests/kube-vip.yaml"
run_remote $host "sudo mkdir -p /etc/rancher/rke2 && cat << EOF | sudo tee /etc/rancher/rke2/config.yaml
token: $predefined_token
tls-san:
- $vip
- $master1
- $master2
- $master3
write-kubeconfig-mode: \"0644\"
disable:
- rke2-ingress-nginx
server: https://$master1:9345
EOF"
run_remote $host "echo 'export KUBECONFIG=/etc/rancher/rke2/rke2.yaml' | sudo tee -a /etc/profile.d/rke2-kubeconfig.sh && echo 'export PATH=\${PATH}:/var/lib/rancher/rke2/bin' | sudo tee -a /etc/profile.d/rke2-path.sh && echo 'alias k=kubectl' | sudo tee -a /etc/profile.d/kubectl-alias.sh"
run_remote $host "sudo chmod +x /etc/profile.d/rke2-kubeconfig.sh /etc/profile.d/rke2-path.sh /etc/profile.d/kubectl-alias.sh"
run_remote $host "curl -sfL https://get.rke2.io | INSTALL_RKE2_TYPE=server sh - && sudo systemctl enable rke2-server.service && sudo systemctl start rke2-server.service"
run_remote $host "mkdir -p \$HOME/.kube && sudo cp /etc/rancher/rke2/rke2.yaml \$HOME/.kube/config && sudo chown \$(id -u):\$(id -g) \$HOME/.kube/config && chmod 600 \$HOME/.kube/config"
}
# Setup worker nodes
setup_worker() {
local host=$1
echo -e "\033[33mSetting up worker node: $host\033[0m"
run_remote $host "sudo systemctl disable --now ufw && sudo apt update"
run_remote $host "sudo mkdir -p /etc/rancher/rke2 && cat << EOF | sudo tee /etc/rancher/rke2/config.yaml
server: https://$vip:9345
token: $predefined_token
node-label:
- worker=true
- longhorn=true
EOF"
run_remote $host "echo 'export PATH=\${PATH}:/var/lib/rancher/rke2/bin' | sudo tee -a /etc/profile.d/rke2-path.sh && echo 'alias k=kubectl' | sudo tee -a /etc/profile.d/kubectl-alias.sh"
run_remote $host "sudo chmod +x /etc/profile.d/rke2-path.sh /etc/profile.d/kubectl-alias.sh"
run_remote $host "curl -sfL https://get.rke2.io | INSTALL_RKE2_TYPE=\"agent\" sh - && sudo systemctl enable rke2-agent.service && sudo systemctl start rke2-agent.service"
}
# Function to check if the webhook service is ready
check_webhook_ready() {
local retries=10
local wait_time=30
for i in $(seq 1 $retries); do
if kubectl get endpoints -n metallb-system webhook-service &> /dev/null; then
echo -e "\033[32mWebhook service is ready.\033[0m"
return 0
fi
echo -e "\033[33mWaiting for webhook service to be ready (attempt $i/$retries)...\033[0m"
sleep $wait_time
done
echo -e "\033[31mWebhook service is not ready after $retries attempts.\033[0m"
return 1
}
# Post-installation tasks
post_install() {
echo -e "\033[33mPerforming post-installation tasks...\033[0m"
echo -e "\033[33mFixing permissions for rke2.yaml and kubectl config...\033[0m"
sudo chmod 600 /etc/rancher/rke2/rke2.yaml
sudo chmod 600 /root/.kube/config
echo -e "\033[33mInstalling MetalLB...\033[0m"
kubectl apply -f https://raw.githubusercontent.com/metallb/metallb/v0.13.12/config/manifests/metallb-native.yaml
echo -e "\033[33mWaiting for MetalLB components to be ready...\033[0m"
kubectl wait --namespace metallb-system \
--for=condition=ready pod \
--selector=app=metallb \
--timeout=500s
echo -e "\033[33mWaiting for MetalLB webhook to be ready...\033[0m"
kubectl wait --namespace metallb-system \
--for=condition=ready pod \
--selector=app=webhook \
--timeout=900s
if check_webhook_ready; then
echo -e "\033[33mDeploying IP Pools and L2Advertisement...\033[0m"
kubectl apply -f metallb-ipaddresspools.yaml
kubectl apply -f metallb-l2advertisements.yaml
echo -e "\033[32mIP Pools and L2Advertisement deployed successfully.\033[0m"
else
echo -e "\033[31mFailed to deploy IP Pools and L2Advertisement. Please check the MetalLB installation and try again.\033[0m"
exit 1
fi
echo -e "\033[33mInstalling Helm...\033[0m"
if ! command -v helm &> /dev/null; then
curl -fsSL -o get_helm.sh https://raw.githubusercontent.com/helm/helm/main/scripts/get-helm-3
chmod 700 get_helm.sh
./get_helm.sh
fi
echo -e "\033[33mAdding Rancher Helm Repo & creating namespace...\033[0m"
helm repo add rancher-latest https://releases.rancher.com/server-charts/latest
kubectl create namespace cattle-system --dry-run=client -o yaml | kubectl apply -f -
echo -e "\033[33mInstalling Cert-Manager...\033[0m"
kubectl apply -f https://github.com/cert-manager/cert-manager/releases/download/v1.13.2/cert-manager.crds.yaml
helm repo add jetstack https://charts.jetstack.io
helm repo update
if ! helm list -n cert-manager | grep -q "cert-manager"; then
helm install cert-manager jetstack/cert-manager \
--namespace cert-manager \
--create-namespace \
--version v1.13.2
fi
kubectl get pods --namespace cert-manager
echo -e "\033[33mInstalling Rancher...\033[0m"
if ! helm list -n cattle-system | grep -q "rancher"; then
helm install rancher rancher-latest/rancher \
--namespace cattle-system \
--set hostname=rancher.my.org \
--set bootstrapPassword=admin
fi
kubectl -n cattle-system rollout status deploy/rancher
kubectl -n cattle-system get deploy rancher
echo -e "\033[33mAdding Rancher LoadBalancer...\033[0m"
if ! kubectl get svc -n cattle-system | grep -q "rancher-lb"; then
kubectl expose deployment rancher --name=rancher-lb --port=443 --type=LoadBalancer -n cattle-system
while [[ $(kubectl get svc -n cattle-system -o 'jsonpath={..status.conditions[?(@.type=="Pending")].status}') == "True" ]]; do
sleep 60
echo -e "\033[33mWaiting for LoadBalancer to come online\033[0m"
done
fi
kubectl get svc -n cattle-system
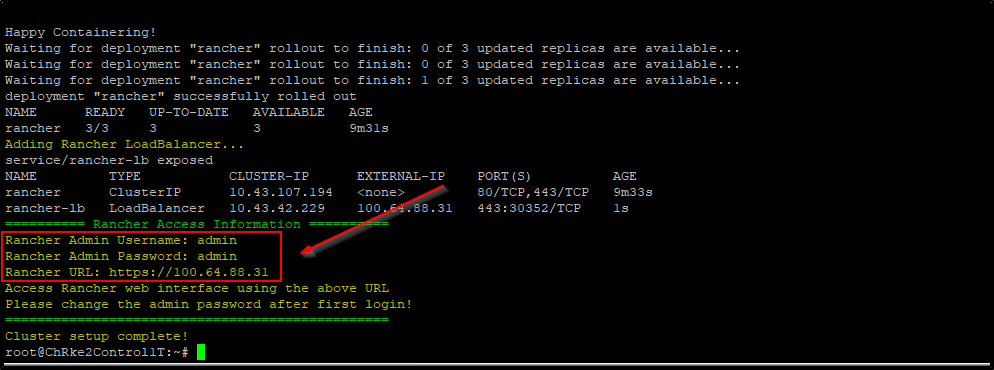
# New section for Rancher access information
echo -e "\033[32m========== Rancher Access Information ==========\033[0m"
echo -e "\033[33mRancher Admin Username: admin\033[0m"
echo -e "\033[33mRancher Admin Password: admin\033[0m"
RANCHER_IP=$(kubectl get svc rancher-lb -n cattle-system -o jsonpath='{.status.loadBalancer.ingress[0].ip}')
echo -e "\033[33mRancher URL: https://$RANCHER_IP\033[0m"
echo -e "\033[33mAccess Rancher web interface using the above URL\033[0m"
echo -e "\033[33mPlease change the admin password after first login!\033[0m"
echo -e "\033[32m================================================\033[0m"
}
# Main execution
install_sshpass_local
create_yaml_files
setup_first_master
setup_additional_master $master2
setup_additional_master $master3
setup_worker $worker1
setup_worker $worker2
setup_worker $worker3
setup_worker $worker4
echo -e "\033[33mWaiting for nodes to be ready...\033[0m"
sleep 120 # Wait for 2 minutes
post_install
echo -e "\033[33mCluster setup complete!\033[0m"How to Use the Script
- Ensure you have SSH access to all the nodes you want to include in your cluster.
- Update the variables at the start of the script with the IP addresses specific to your infrastructure or network, along with any other necessary configuration details. Then, save the script to your primary master node with the name
RKE2-Cluster-Deploy.sh - Make the script executable:
chmod +x RKE2-Cluster-Deploy.sh - Run the script:
./RKE2-Cluster-Deploy.sh
The script will automatically set up your entire cluster, including all necessary components.
Accessing Rancher
After the script completes, it will display the Rancher access information. Here's how to log in to Rancher:
- Open a web browser and navigate to the Rancher URL provided by the script. It will be in the format:
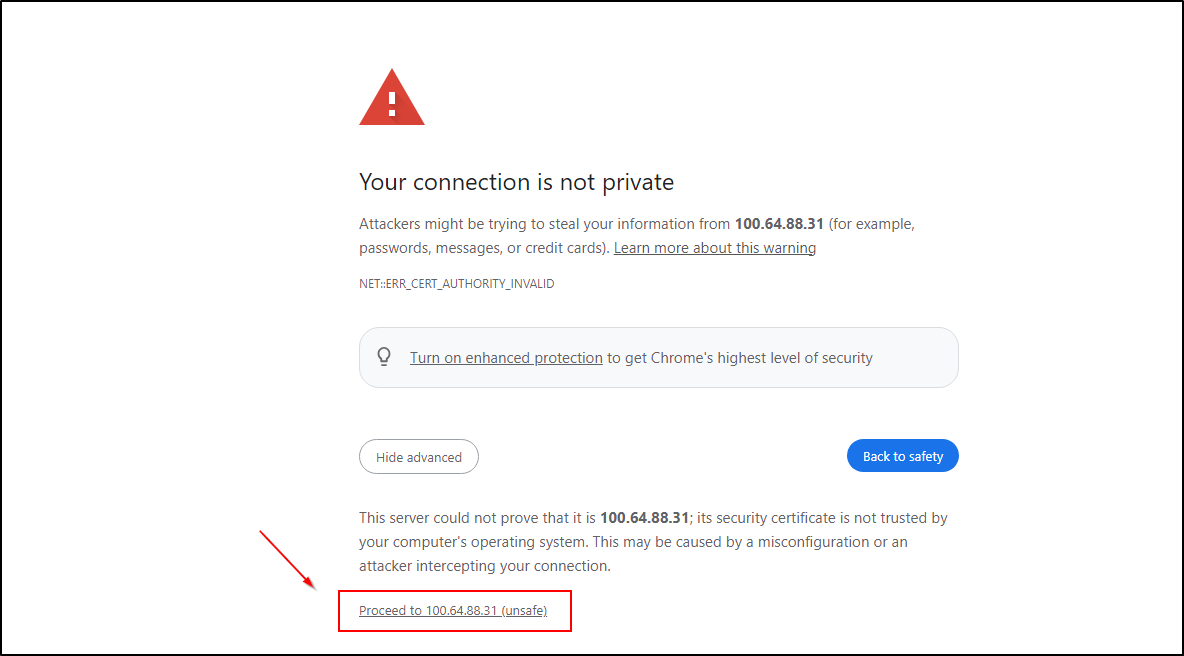
https://<RANCHER_IP> - You may see a security warning due to the self-signed certificate. This is expected for the initial setup. Proceed to the website.
 4. On the login page, use the following credentials:
- Username:
admin - Password:
admin
- After logging in, you will be prompted to change the admin password. Choose a strong, unique password for your Rancher installation.
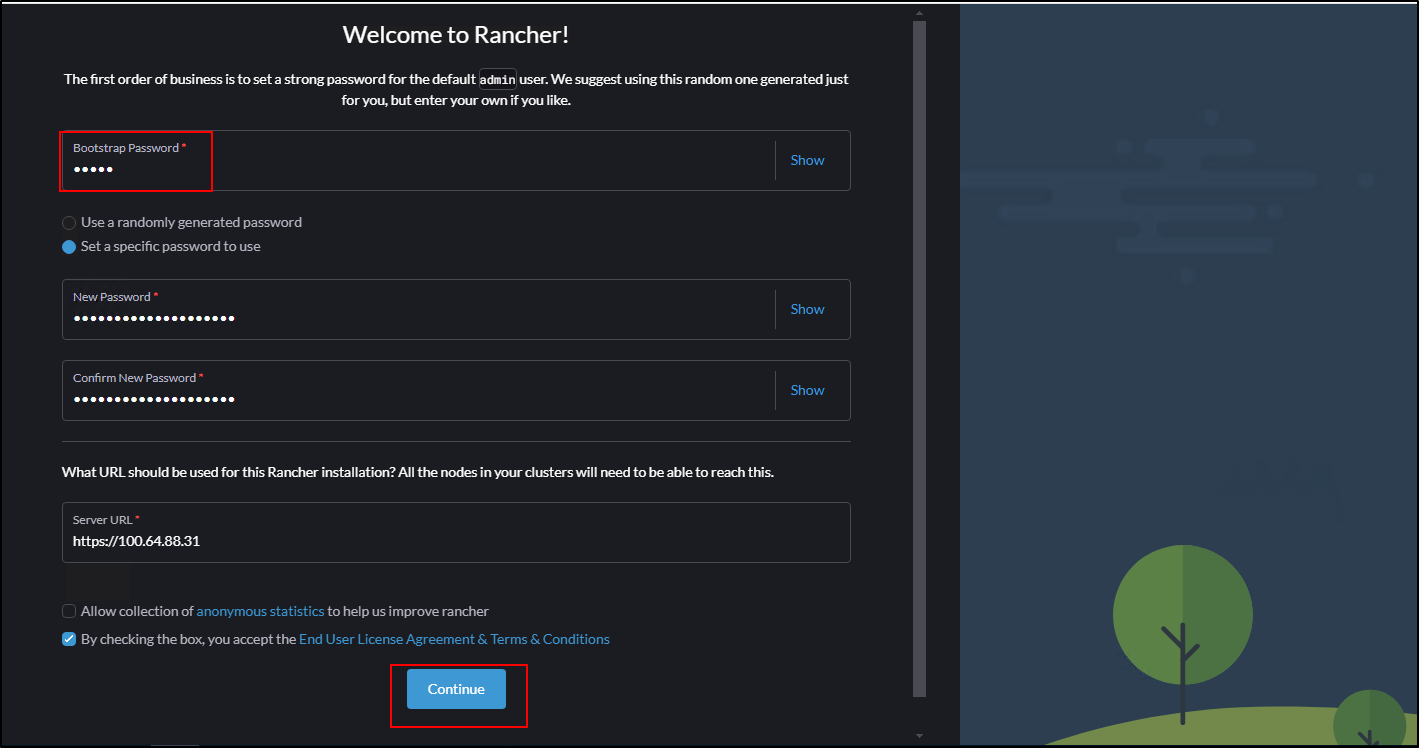
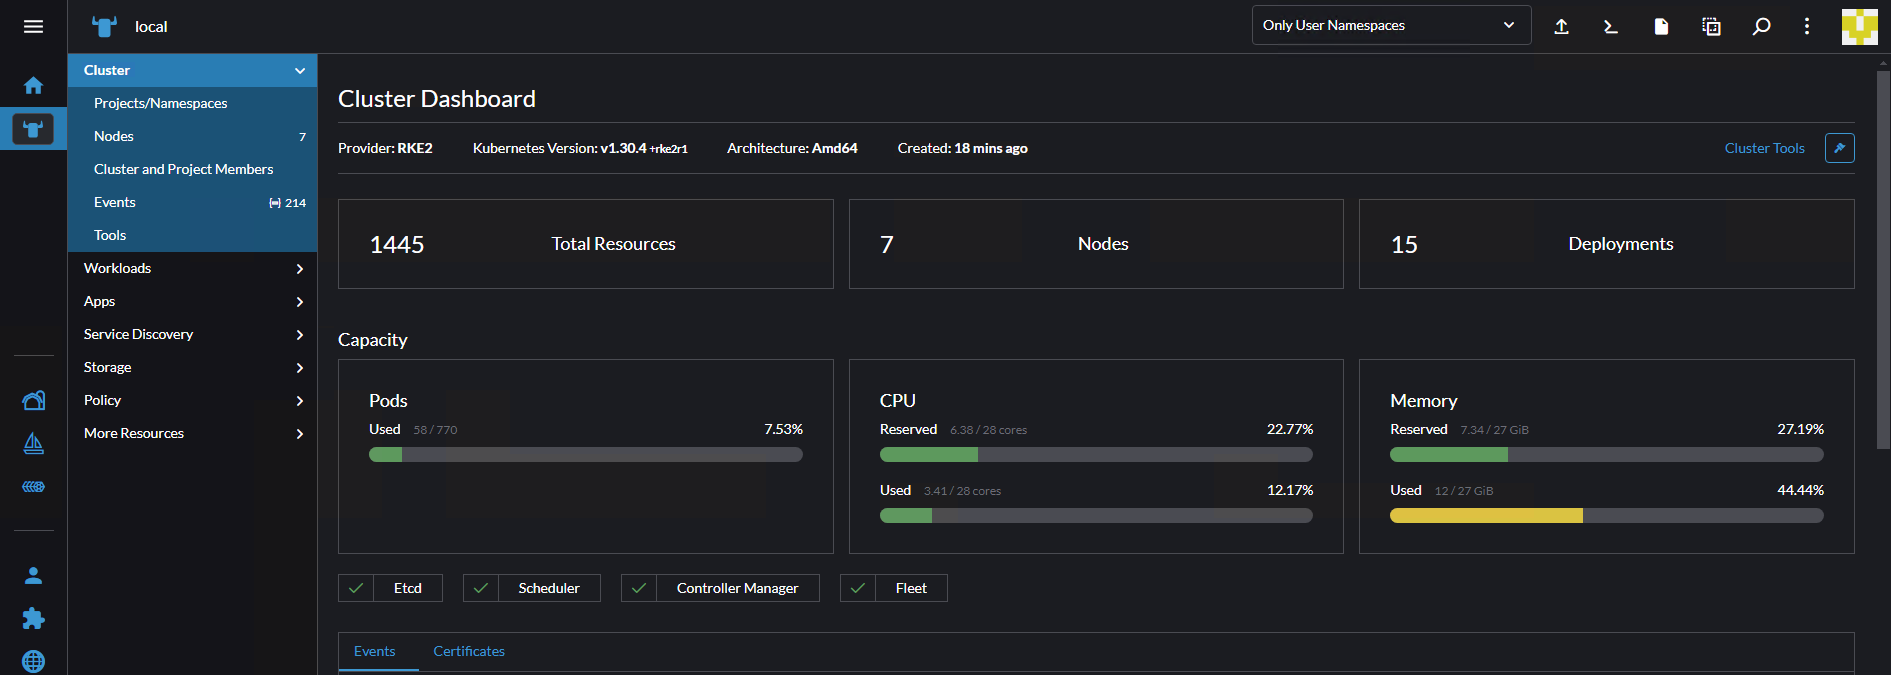
- Once you've changed the password, you'll have full access to the Rancher dashboard, where you can manage your cluster, deploy workloads, and configure additional settings.
 Remember to secure your Rancher installation by setting up proper authentication, authorization, and network policies after the initial setup.
Conclusion
This script provides a powerful way to quickly set up a production-ready Kubernetes cluster using RKE2. By automating the setup of components like kube-vip, MetalLB, and Rancher, it significantly reduces the time and complexity involved in cluster creation.
Whether you're setting up a development environment or preparing for production deployment, this script can be an invaluable tool in your Kubernetes journey.
Remember to always review and understand any script before running it in your environment, and make sure to adjust the variables to match your specific setup.
Happy Kuberenetes clustering!